How I started with Git and Github
As far as I can remember it was the time of Hacktoberfest-2019 hosted by amFOSS when first time I had heard about Git & GitHub. We were supposed to create Pull Requests and they were monitoring who were creating their PR faster and top 10 were getting rewards. Not only by them even we can get official rewards like T-Shirt and cool stickers from Hacktoberfest for creating three Pull Requests. Well that’s a preety fun way to start with Git,isn’t it?
…do you really just want to contribute to your first open source project?
This one’s for you!
It’s totally easy to get started with Git. If you’re a fast reader (and you don’t take a lot of time with sign up and installation), you can be up and running on GitHub about ten minutes from right now.
If you go all the way through the article, you can practice cloning an existing repository, creating a branch, making changes, and creating a pull request. Along the way, you might also learn how to find your terminal, use terminal commands, and edit a markdown (.md) file!
This article will get you up and running with the basics. There’s a lot of stuff to learn if you want to use Git and GitHub like a pro, of course. You can go way beyond this introductory information! We’re going to leave the next-level stuff for another time, though.
Let’s get started!
What is Git? What’s GitHub?
Git is the version control tech of choice for basically everybody right now, from developers to designers. GitHub is the social code-hosting platform that’s currently used more than any other. It’s a place where you can play and experiment. It’s a place where you can find (and play around with) the most incredible open-source information, emerging technologies, features, and designs. It’s a place to learn and it’s a place to get involved. You can keep code there for work or for school, and you can grab some sweet code that you want to explore further. You can even host websites for free directly from your repository! If you want to know how to do that, check out this article!
There are a ton of ways to use Git and GitHub, but getting started with GitHub doesn’t have to be overwhelming. You don’t need to be some kind of master coder or anything. You can even do the most important things right on the GitHub website!
That being said, it’s a good idea to find your terminal and get just the tiniest bit comfortable with it. Terminal commands make things so much faster! I’ll definitely show you how to get started using the GitHub website. I’ll also show you some terminal commands that you might want to use to make your life just a little bit nicer.
Any time you see a command in this article that includes these marks:
< >, you want to delete those marks and replace what’s between them with your own information. Let’s say you see something likegit add <filename>. That means that you would type, for example,git add hello_world.pyif you wanted to add a file named “hello_world.py” to your GitHub repository.
I’m going to give you a lot of explanation here, but these are all the terminal commands that you really need to know to get started:
git clone
git status
git add
git commit -m " "
git push
That’s it! Those are the big ones! If you have a handle of those, you’re good to go. You can start working on your projects immediately!
We’ll also talk about
git init
git branch
git merge
git checkout
You might be working with other people, or you might want to make changes and test them out before you really commit them. The commands above are what you need to get started with collaboration.
git help
is also seriously useful if you’re just starting out! We’ll discuss that too.
(If you’re on a Mac, you already have a terminal! You can search for it by clicking on the magnifying glass icon in the upper right-hand corner of your screen and searching for the word “terminal.” )
Step 1: Sign up and installation!
Go to GitHub and sign up for an account. You could just stop there and GitHub would work just fine. It’s a good idea, though, to install Git if you haven’t already. You can absolutely get started without it, but if you want to work on your local computer, then you want to have Git installed. You can download it or install it via your package manager instead.
Now go to your terminal and introduce yourself to Git! To set your username for every repository on your computer, type
git config --global user.name "<your_name_here>"
replacing "<your name here>" with your own name in quotations. You can use any name or handle you want. If you want to set your name for just one repository, leave out the word “global.”
Now you can tell Git your email, and make sure it’s the same email you used when you signed up for GitHub
git config --global user.name "<your_name_here>"
It’s easy to keep your email private, and you can find those instructions in this article. You only need to check two boxes in your GitHub account.
Now you’re ready to start using Git on your computer!
To get started, you can create a new repository on the GitHub website or perform a git init to create a new repository from your project directory.
The repository consists of three ‘trees.’ First is the working directory, which holds the actual files. The second one is the index or the staging area. Then there’s the head, which points to the last commit you made.
I’m already comfortable with the terminal (Option 1)
Here’s how you can get started right from the terminal:
git init
If you want to initialize your project with all of the files in your project directory, run
git init .
to include everything.
Let’s say you have a folder for your project called “new_project.” You could head on over to that folder in your terminal window and add a local repository to it by running
cd new_project
git init
Now you have a new hidden directory called .git in your project directory. This is where Git stores what it needs so that it can track your project. Now you can add files to the staging area one by one with
git add <filename_one>
or run
git add .
to add all of your files to the staging area. You can commit these changes with the command
git commit -m "<add a commit message here>"
and if you’re happy with your changes, you can run
git push
to push your changes through. You can check whether or not you have changes to push through any time by running
git status
If you made some changes, you can update your files on at a time with
git add <filename>
or
git add --all
Then commit them with your commit message and push them through.
That’s it! You can now initialize a repository, commit files, commit changes, and push them through to the master branch.
If you’ve got this, just scroll down to “Learning to work with others” to move on to branching and collaboration!
I don’t know what you just said (Option 2)
I’m going to assume that anyone who’s interested in option 2 is brand new to all of this and maybe has a folder full of files (or you plan to have one) that you want to put on GitHub and you just don’t know how to do that.
Let’s make that happen!
Say you want to create a new repository. (You probably do! That’s where your project will live. If you aren’t going to create a new repository, you probably want to clone an existing repository. We’ll talk about that next, but that’s how you grab someone else’s project and information that you need for your job or the course you’re taking.)
Your repository is where you’ll organize your project. You can keep folders, files, images, videos, spreadsheets, Jupyter notebooks, data sets, and anything else your project needs. Before you can work with Git, you have to initialize a repository for your project and set it up so that Git will manage it. You can do this right on the GitHub website.
It’s a smart idea to include a README file with information about your project. You can create one at the same time that you create your repository with the click of a checkbox.
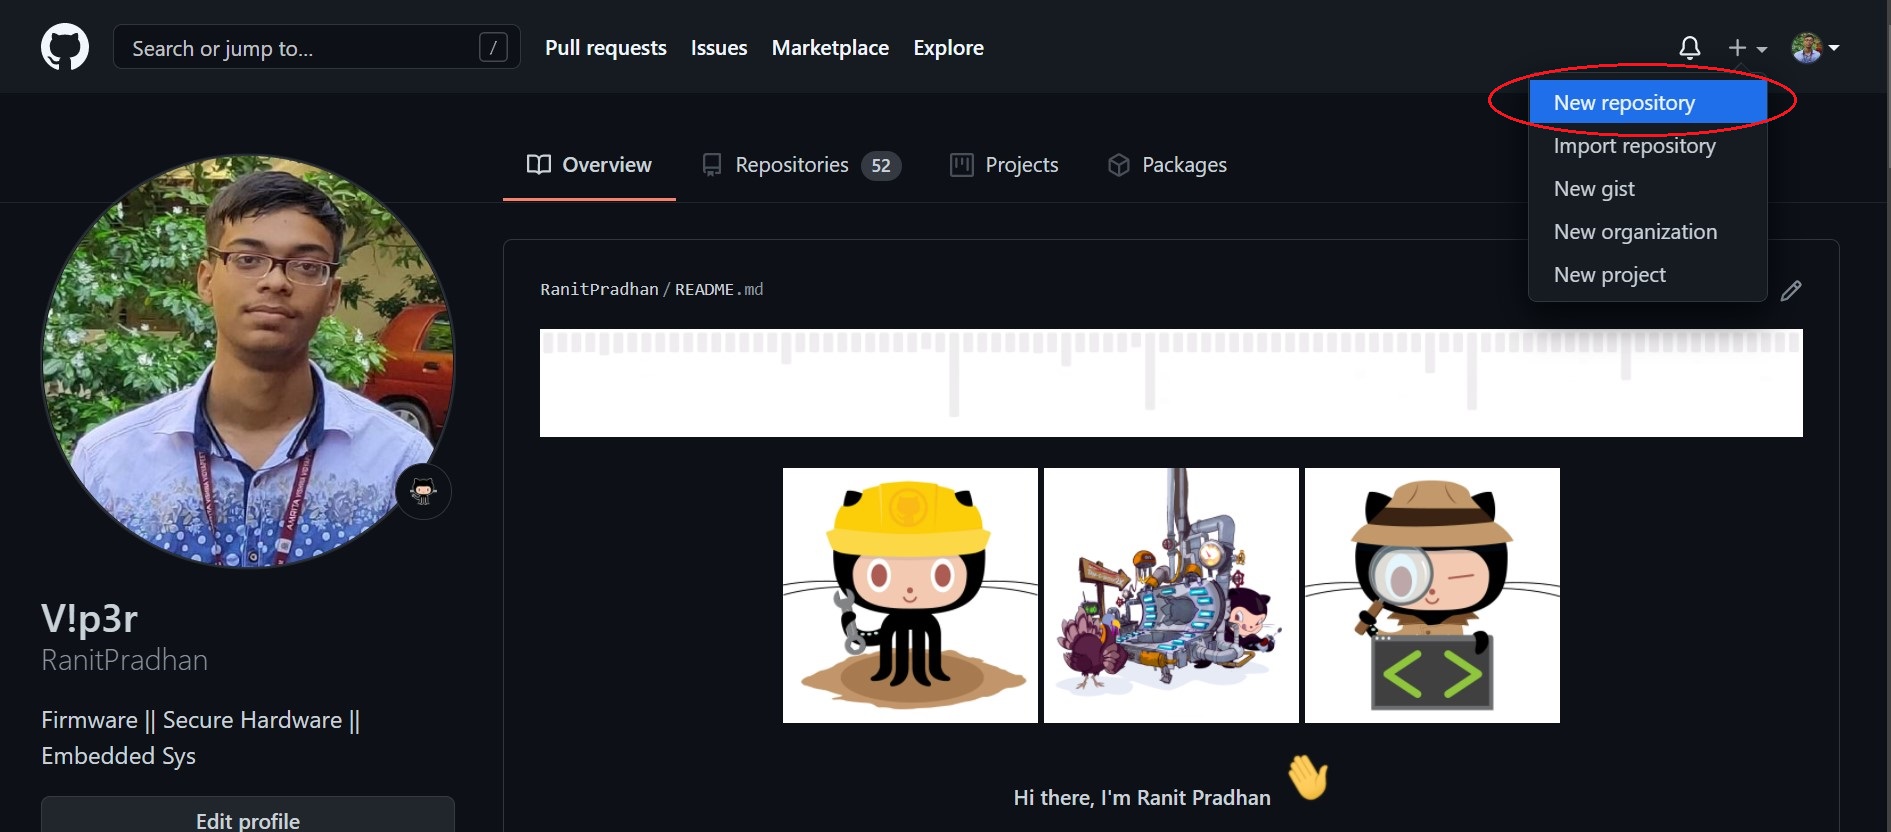
- Go to the GitHub website, look in the upper right corner, and click the + sign and then click “New repository.”
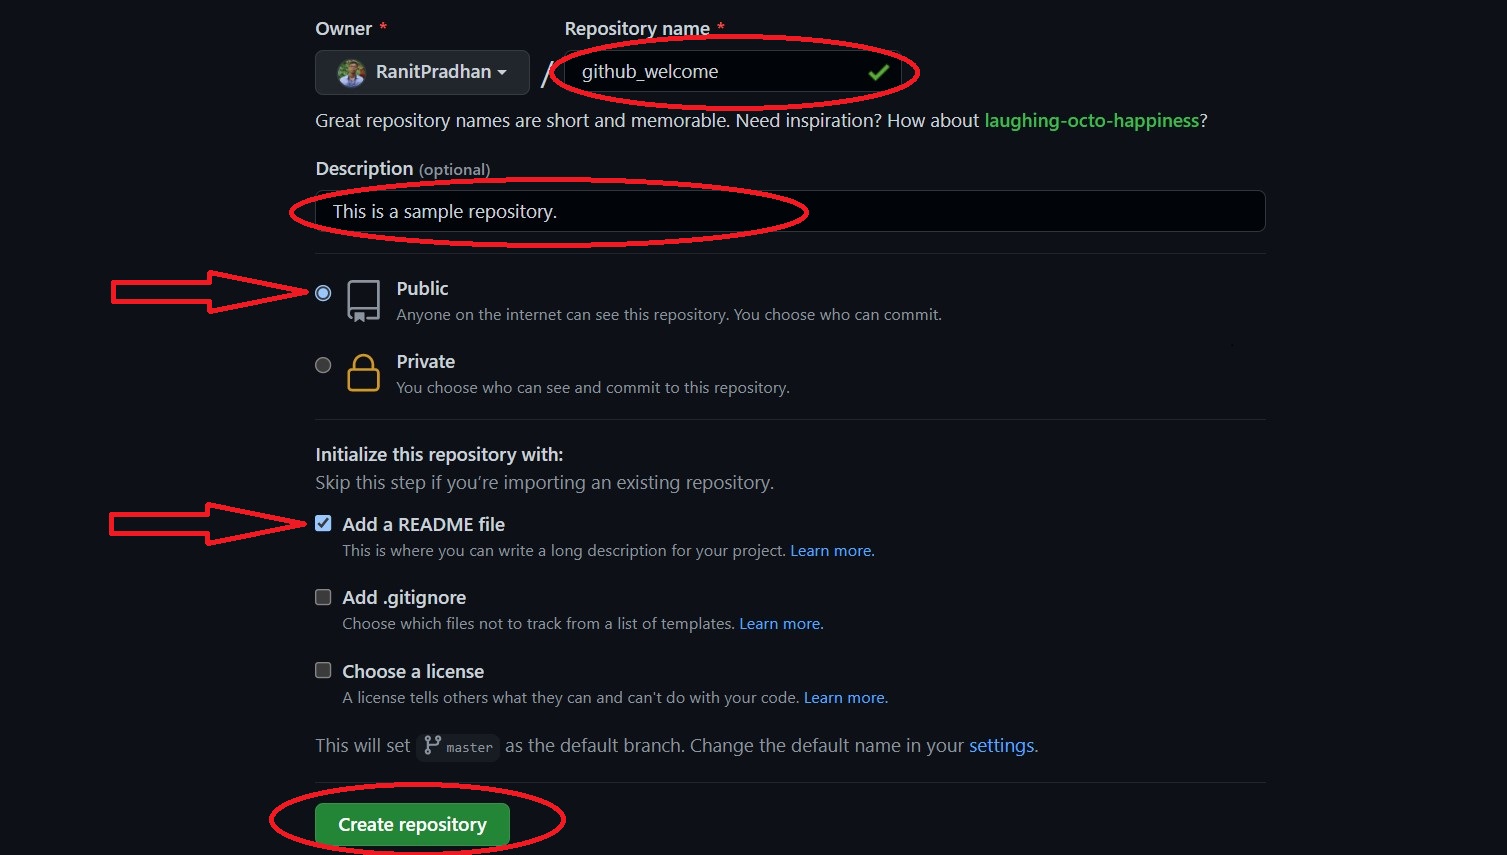
- Name the repository, and add a quick description.
- Decide whether you want this to be a public or a private repository
- Click “Initialize this repository with a README” if you want to include the README file. (I definitely recommend doing this! It’s the first thing people are going to look at when they check out your repository. It’s also a great place to put information that you need to have in order to understand or run the project.)
You can totally start working right from this point if you want to! You can upload files, edit files, and so on right from your repository on the GitHub website. However, you might not be satisfied with only this option.
There are two ways to make changes to your project. You can make changes in your files/notebooks on your computer and you can also make changes right on GitHub. Let’s say you want to make some changes to your README file right on GitHub.
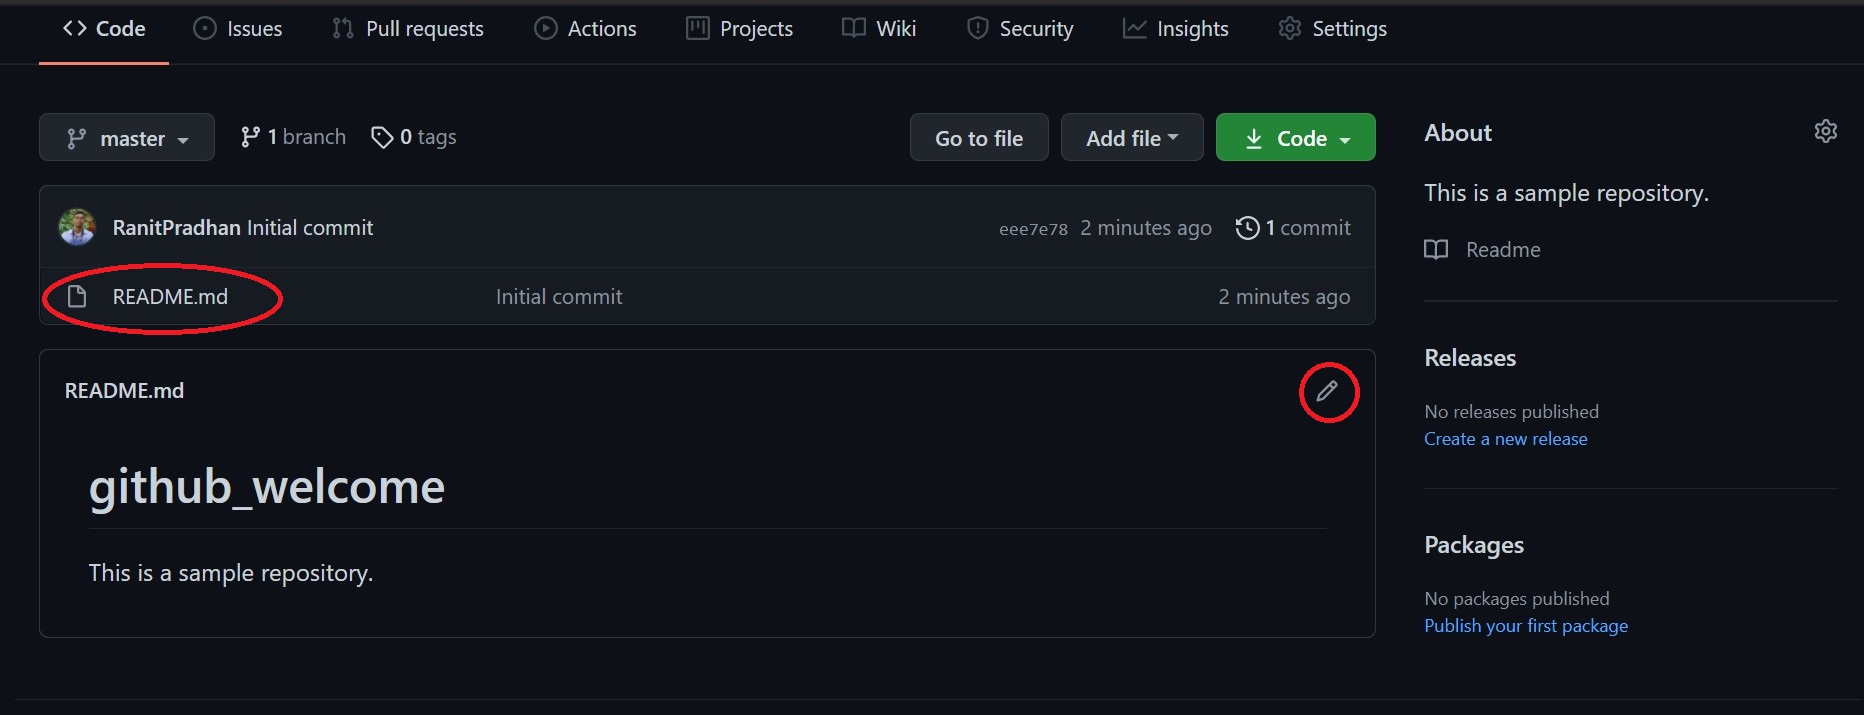
- First, go to your repository.
- Click the name of the file to bring up that file (for example, click “README.md” to go to the readme file).
- Click the pencil icon in the upper right corner of the file and make some changes.
- Write a short message in the box that describes the changes you made (and an extended description if you want).
- Click the “Commit changes” button.
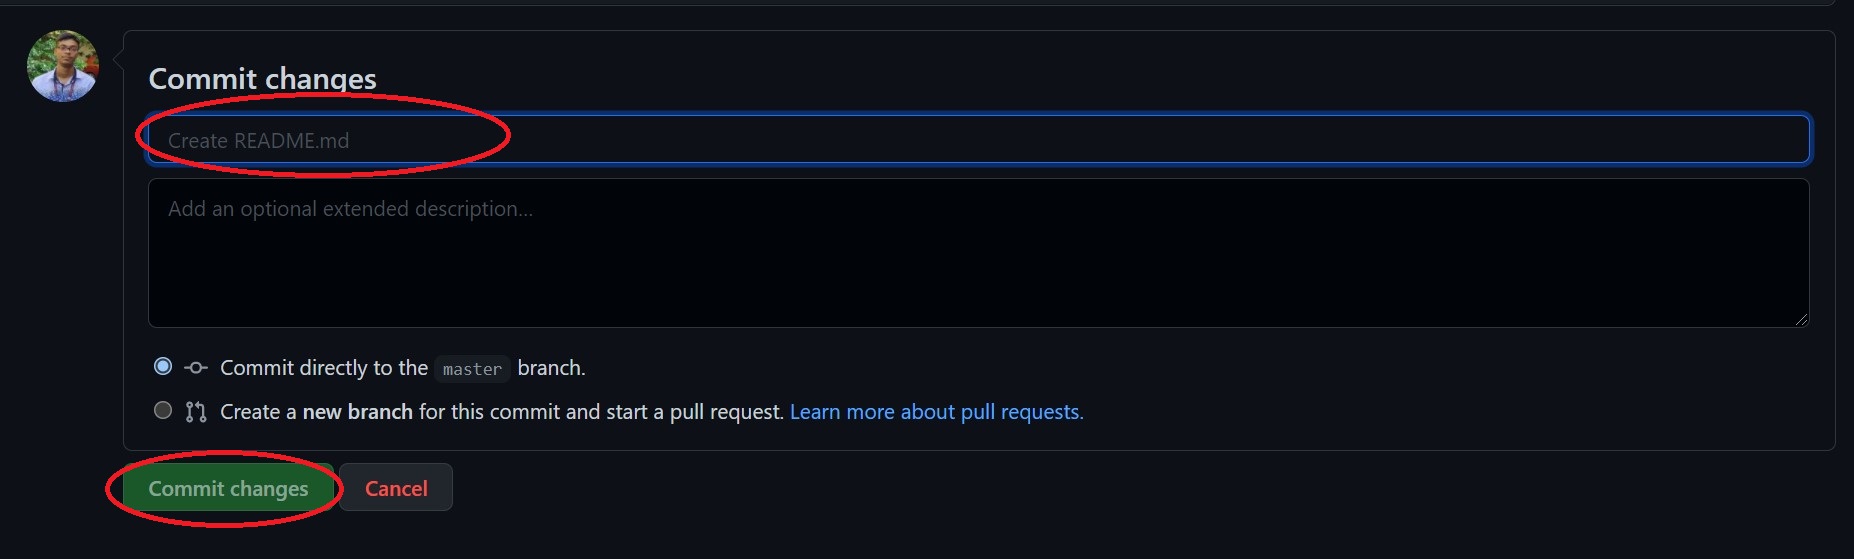
Now the changes have been made to the README file in your new repository! (I quickly want to draw your attention to the little button you can check in the image above that will let you create a new branch for this commit and start a pull request. We’ll talk about this later!)
Pretty easy, right?
I prefer to work with files on my local computer rather than try to make everything work from the GitHub website, so let’s set that up now.
Gimmie that project!
You might want to clone your new repository so that you can work on it on your local computer, or you might have an existing repository that you want to clone. (That’s something you might need to do that for a project or course.)
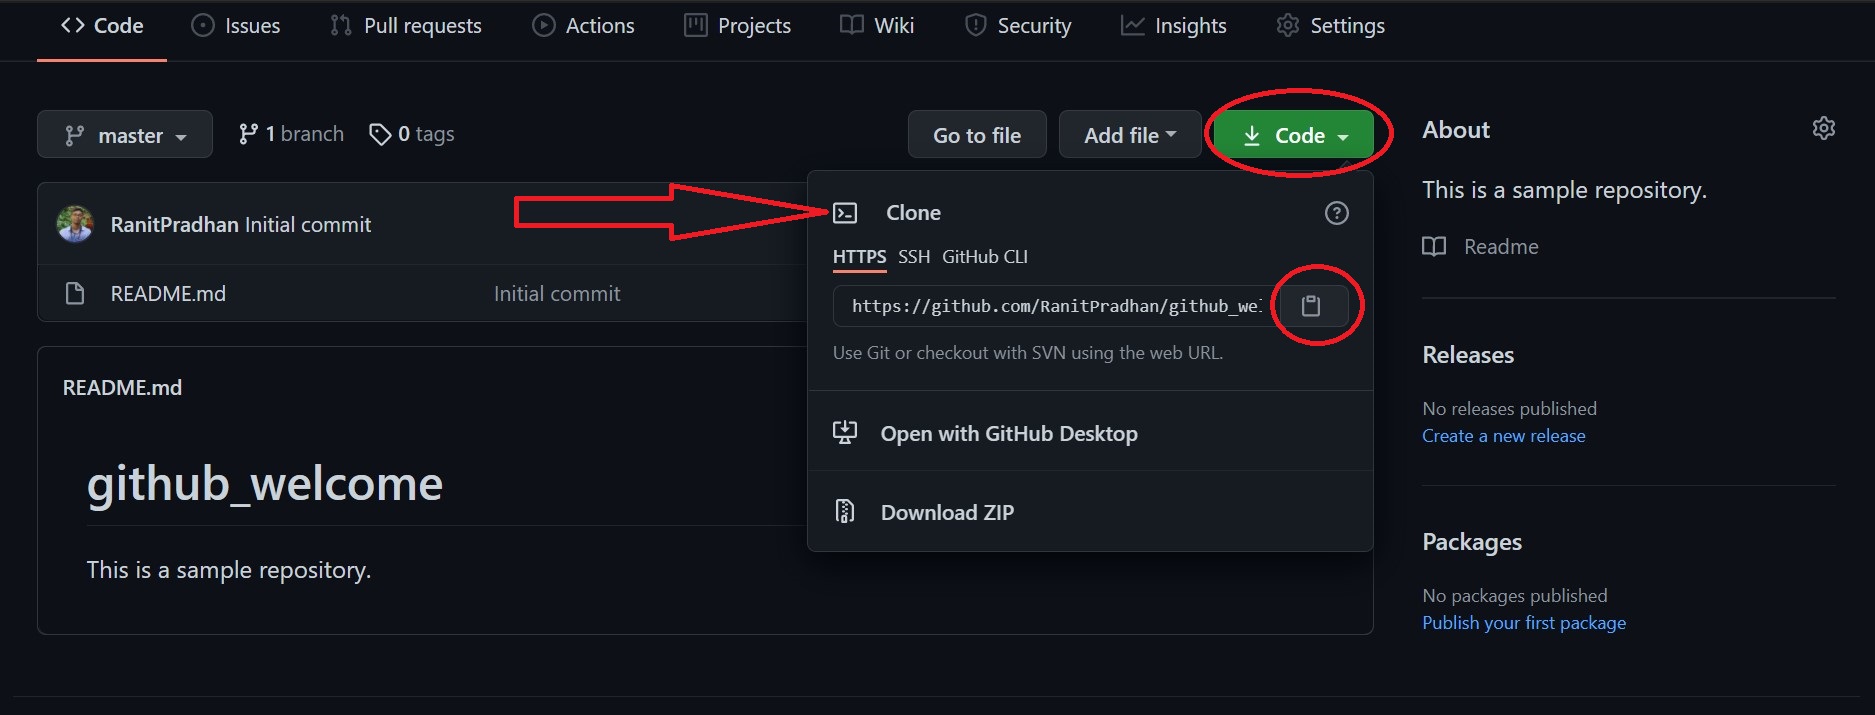
In order to clone a repository onto your computer, go to the repository on the GitHub website and click the big green button that says “Clone or download.” (You can definitely download the repository right there and skip the terminal stuff if you just can’t deal with it. But I believe in you, so keep going!) Make sure it says “Clone with HTTPS.” Now click the clipboard icon to copy and paste it to your clipboard (or highlight that link and copy it).
Now you’ll open up your terminal and get yourself to the place where you want that repository to land. You might be able to, for instance, type
cd Desktop
to get onto the desktop. Then clone your repository right there to make it easy to find. To clone the repository, you type
git clone <that_thing_you_just_copied>
Simple! (Don’t forget to change the information between the < > marks to that string of letters and numbers you just copied! Also, make sure you delete the < >.)
If you haven’t moved around in your terminal before, you can move around slowly with the
cdcommand until you get where you want to go. For example, open up your terminal and typelsto list the choices of where you might go next. You might see “Desktop” listed, and you could just typecdDesktop to get to your desktop. Then you can run thegit clonecommand above to clone your repository right onto your desktop. You might see some user names instead of choices like “Desktop.” In that case, you need to choose a user before you see “Desktop,” so choose the user withcd <user>(replacing<user>with the user name) and then typelsagain to see your choices. There’s a very good chance you’ll see “Desktop” now. You’ll typecd Desktopif you see the Desktop listed. Now go ahead with that git clone! If you ever want to move back a step in your terminal, just typecd ..
Now you have a new GitHub repository that you can work with cloned right on your desktop! That command pulled in a complete copy of the repository right to your system where you can work on it, make changes, stage the changes, commit the changes, and then push the changes back to GitHub.
You don’t need to put the repository on your desktop if you don’t want to. You can clone it anywhere. You can even run the
git clonecommand as soon as you open up your terminal. I will say, though, that if you aren’t really comfortable navigating around your computer, it’s not a bad idea to have your project sitting right on your desktop where you can see it…
If you ever want to just play with a project on your own, you can fork it on the GitHub website instead of cloning it. Look up near the top right corner of the screen for the “fork” button and click it. This will make a copy of the repository in your repositories for you to play with on your own without doing anything to the original.
Now it’s time to add some files to your project!
This is all we’re about to do:
git status
git add
git commit -m " "
git push
Nothing to worry about!
I’m thinking you probably have some files that you want to put in your new repository. Go ahead and find your files and drag and drop them into the new folder for the repository that you created on your desktop, just like you normally would with any set of files you might want to move into a folder.
Now, check out the status of your project!
Go to your terminal and get yourself into the folder for your repository. Then run
git status
to see if everything is up to date. (If you just dragged some files into your project folder, it definitely isn’t!) To add one of your files to the repository, you would run
git add <fileneame>
Otherwise, you can add everything with
git add --all
or even
git add .
These are your proposed changes. You can do this exact same thing with brand new files and with files that are already in there but have some changes. You aren’t actually adding anything just yet. You’re bringing new files and changes to Git’s attention.
To commit the changes, you will start the process by running
git commit -m “<commit message>”
You’re committing the changes to the HEAD, but not to the remote repository. (Make sure you replace that message in quotes with your own.) After you make a change, you take a “snapshot” of the repository with the “commit” command. You‘ll include a message on that “snapshot” with -m.
When you save a change, that’s called a commit. When you make a commit, you’ll include a message about what you changed and/or why you changed it. This is a great way to let others know what you’ve changed and why.
Now your changes are in the head of your local working copy. To send the changes to your remote repository, run
git push
to push your changes right into your repository. If you’re working on your local computer and you want your commits to be visible online too, you would push the changes up to git hub with the git push command.
You can see if everything is up to date any time by running the git status command!
So now you have a GitHub repository and you know how to add files and changes to it!
Congratulations!!!